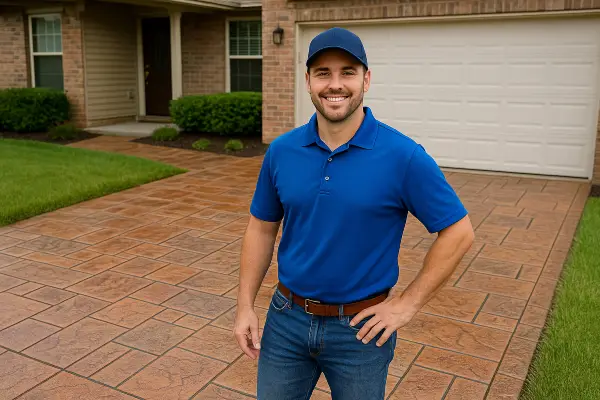
Concrete Driveway Installation Timeline: What to Expect from Your Contractor
Homeowners usually focus on the finished slab: smooth surface, clean edges, vehicles parked without a second thought. The real story starts earlier, with soil prep, forms, drainage, and a clock that begins ticking the moment the cement truck swings its chute toward the forms. A concrete driveway is part engineering, part choreography. When the scheduling, Concrete Tools, mix design, weather, and crew all line up, you get a driveway that lasts decades. When they don’t, you see cracks, scaling, or heaving long before their time.
What follows is how a typical driveway job unfolds, with the time windows a careful Concrete Contractor will target, and the reasons for the pauses that might frustrate you at first glance. Not every site is the same, and not every region pours the same way, but the sequencing is surprisingly consistent if you want a durable result.
First conversations and site walk
Most driveway projects start with a phone call and a look at the site. A competent contractor will ask about vehicle weights, how many cars you park, whether you salt in winter, and how water moves across your yard during a heavy rain. Expect a tape measure, a stick level or laser, and a few flags to mark edges. If there are trees, they will talk about roots. If the old drive is failing, they will look for causes: poor base, insufficient thickness, lack of joints, or downspouts dumping water beneath the slab.
Pricing often includes two line items that people forget: base preparation and disposal. If removal of an old asphalt or concrete driveway is involved, that step adds time and noise, and sometimes a permit. In many municipalities, replacing a driveway inside the same footprint is straightforward. Expanding or altering the approach to the street may require approval. A diligent contractor will handle permitting early, because your schedule hinges on that green light.
Mix design decisions that matter
Before any dirt moves, the contractor should confirm the mix and thickness. The bare minimum compressive strength Concrete PSI for residential driveways runs around 3,500 to 4,000 PSI at 28 days. I prefer 4,000 PSI in freeze-thaw climates, often with 5 to 6 percent air entrainment to resist salt and deicing chemicals. Air entrainment is not fluff, it opens tiny voids that relieve pressure as water expands when it freezes.
If you regularly park a work truck or RV, bumping to 4,500 PSI and increasing slab thickness to 5 to 6 inches pays for itself in longevity. Fiber reinforcement, a fine synthetic mixed at the batch plant, helps control surface microcracking. It does not replace steel reinforcement, which spreads loads and bridges minor subgrade imperfections. For most drives I specify either 6x6 W2.9 welded wire or, better, #3 rebar on 24 inch centers each way, tied and chaired so it stays in the middle third of the slab.
The mix’s slump affects finishing and durability. A workable 4 to 5 inch slump is common. If a crew adds water on site to make placing easier, strength drops and surface issues rise. Watch for the crew lead to measure slump from the cement truck and to ask the driver for water only in measured increments, or to add a water reducer admixture instead. These are small signals that the team values quality over speed.
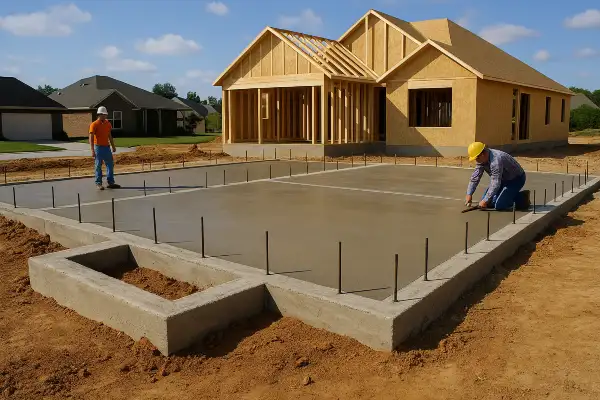
Demolition and excavation
On a straightforward replacement, removal and rough grading usually take a day. Skid steers, jackhammers, and saws come out early. If the existing concrete is thick or steel-reinforced, it might stretch into a second day. Good crews minimize damage to adjacent lawns and sidewalks by using plywood mats. They also sawcut clean edges at tie-ins to walkways or garage slabs instead of smashing them and trying to patch later.
Depth matters. After removal, the excavation should allow for the new base plus the slab. For a 4 inch slab over a 4 to 6 inch base, expect 8 to 10 inches from finished grade. A contractor will chase unstable spots, sometimes digging an extra few inches where clay or organics appear, then replacing with compactable aggregate. If the crew hits utilities shallower than expected, the schedule pivots to coordination and protection, not improvisation.
Subgrade and base preparation
What happens under the concrete controls what happens to the concrete. The target is a uniform, well-compacted, free-draining base. The usual practice is a 4 to 6 inch layer of crushed stone or recycled concrete aggregate graded to 3/4 inch minus, compacted in lifts with a plate compactor or small roller. In soggy soils, a woven geotextile fabric goes down first, separating the soil from the base to stop fines from pumping up into the rock.

I check for compaction by watching how the plate compactor behaves, then stepping off the area in different directions to feel for spongy spots. Some contractors run a nuclear density gauge, though that is rare in residential work. A reasonable test is to dig a small hole and probe the layers with a screwdriver. If you can easily sink it to the handle, compaction is suspect. Expect this base work to take a half day to a full day, longer for large or sloped drives.
Drainage shows up here as well. The base should shed water away from the house. A quarter inch per foot pitch is typical, adjusted to existing grades. On long drives, you may see a center crown. Where water concentrates, the contractor may add a trench drain or adjust swales. Do not accept a perfectly flat base just because it looks neat. Flat slabs hold water, then frost and salt do the rest.
Formwork and layout
Forms define edges and variable thickness. Most crews use 2x4 or 2x6 lumber for residential work, pinned with stakes and aligned with string lines or a laser. Curves require flexible forms or kerfed lumber. Before concrete arrives, the foreman should check the diagonal measurements so the layout is true and the slab thickness meets spec. A common failure is thin edges where the drive meets the garage slab. A good detail is to drop the base slightly at that interface and thicken the edge for strength.
Control joint layout happens now. Joints control where shrinkage cracks appear. As a rule of thumb, joint spacing equals 24 to 30 times the slab thickness. For a 4 inch slab, keep joints around 8 to 10 feet apart, forming squares or near squares. Long, skinny panels crack unpredictably. If you like a clean grid, this is the time to mark it. Where the drive changes direction or width, add joints to break stress points.
Timewise, formwork and layout are often a half day to a day for a typical suburban driveway. Large or intricate drives take longer, especially with curves or decorative features.
Reinforcement placement and final checks
If you are using welded wire mesh, it should not lie on the base. It belongs in the middle third of the slab thickness. Crews either prop it up on chairs or lift it during the pour. Lifting mesh is inconsistent, so chairs do a better job. Rebar grids require chairs and ties, with special attention at transitions and drive approaches. Contraction joints can be planned to align with rebar spacing and to include rebar dowels where you need load transfer without preventing joint movement.
Before the pour, expect a last sweep of the base, removal of organic debris, a light moisture spray in hot weather to keep the base from sucking water out of the mix, and a check that the reinforcement sits where it should. This is also the moment to stage Concrete Tools: screeds, bull floats, magnesium hand floats, edgers, jointers, a vibrator for edges and around rebar, a power trowel if appropriate, and a curing compound sprayer. If stamped or broom finishes are planned, the crew lays out mats or stiff brooms and checks release agents.
Scheduling the pour and the cement truck
Concrete is perishable. Once batched, the clock runs. Most suppliers set a 60 to 90 minute window from loading at the plant to discharge on site. If your home is far from the plant or traffic is unpredictable, your contractor will stage trucks in sequence. A single cement truck carries roughly 8 to 10 cubic yards, depending on local limits. A typical two-car driveway might take 10 to 15 yards. Larger drives need multiple loads and careful timing to avoid cold joints.
Morning pours are common because temperatures are cooler, which buys finishing time. In hot weather, you might see a retarding admixture added at the plant to slow down set, or the team might request a lower concrete temperature by adding chilled water or ice. In cold weather, accelerators and heated water come into play, but they still keep soil temperatures in mind. No one wants to place concrete on a frozen base. If overnight lows threaten, blankets and temporary heat are scheduled.
Once the chute swings over the forms, you will see a coordinated motion: placing, vibrating edges, screeding off the top with a straightedge, then bull floating to embed aggregate and open the surface. The first hours are decisive.
Finishing sequence and timing on pour day
From discharge to final finish, the timeline is sensitive to temperature, humidity, wind, and mix. On a mild day with a 4,000 PSI mix and moderate slump, expect:
- Placing and screeding: 30 to 90 minutes, depending on size and volume. A driver will keep drum rotation minimal to avoid overmixing. The crew will vibrate near edges and around dowels to remove voids without bringing too much paste to the surface.
- Initial bull floating and rest period: 20 to 40 minutes as bleed water appears. Good finishers wait for bleed water to dissipate. Working bleed water back into the surface traps it, weakening the top layer and inviting scaling. This waiting time is where impatient jobs go wrong.
- Edge, joint, and surface finish: 30 to 90 minutes. Edgers define borders. Jointers cut tooled joints where planned, and crews may also sawcut later. A broom finish is common for driveways because it provides traction. The timing of the broom pass matters. Too early leaves paste ridges that peel. Too late tears the surface.
- Curing application: 10 to 20 minutes. As soon as the surface can take it without marring, a curing compound goes on, or wet curing begins with coverings.
The entire active window for the crew might be 3 to 6 hours for a standard driveway. On a hot, windy day, it compresses. On a cool, humid day, it stretches. Your contractor watches the surface, not the clock.
Joints: sawcut timing and details
Even if joints were tooled, most crews return to sawcut contraction joints to a depth of at least one quarter of the slab thickness, so roughly 1 inch deep for a 4 inch slab. The key is timing. Cut too early and raveling occurs. Cut too late and random cracks may already be forming. The sweet spot is often 6 to 24 hours after placement, again dictated by weather and mix. In hot, dry weather, they might cut the same evening. In cool conditions, the next morning works.
At driveway approaches and where the slab meets existing structures, isolation joints are used to let the slab move independently. A strip of expansion material, often 1/2 inch thick, sits between the slab and fixed elements like garage foundations, light pole bases, or steps. Skipping this detail transfers stress into your house or produces cracks along the interface.
Curing and early-life care
Curing is the least glamorous part of the job and the most important for strength and durability. Concrete does not dry, it hydrates. That chemical reaction requires moisture and moderate temperatures. The first week is critical. Proper curing can boost surface strength and reduce shrinkage cracking.
There are several approaches. Liquid curing compounds sprayed after finishing form a membrane that slows evaporation. They work well for broom-finished driveways. Wet curing with soaker hoses and coverings like burlap or plastic is effective but labor-intensive and messy in a residential setting. In hot or windy weather, I often prefer a combination: an initial curing compound, then periodic light misting for the first couple of days if conditions are aggressive.
Your contractor will set a walking timeline: typically you can walk on the slab after 24 to 48 hours. Keep pets with sharp claws off for that first day. Light equipment such as a lawn mower can often roll after 3 to 4 days if you avoid tight turns. Passenger vehicles should wait 7 days for a standard 4,000 PSI mix. For heavier vehicles or cooler weather, 10 to 14 days is safer. Full design strength arrives at 28 days.
Avoid sealing too early. Many solvent-based sealers need the slab to breathe and release moisture before application. Some water-based cures double as sealers, but I prefer a dedicated sealer applied after 28 days if deicers are common. If you cannot wait, pick a breathable product designed for early application and follow the manufacturer’s window.
Weather delays and how they shape the schedule
Forecasts drive planning. If rain threatens during finishing, expect a postponement. A brief sprinkle before setting can wash cement paste off the surface, leaving a weak, sandy top. A heavy rain hours after finishing can pit the surface. Hot, dry winds cause plastic shrinkage cracks before finishing even completes. In those conditions, look for windbreaks, evaporation retarders sprayed on the surface, and extra hands to speed finishing. Cold snaps require heated water in the mix, ground thawing days prior, and insulated blankets after placement. None of these precautions are optional if durability matters.
Delays frustrate everyone, but a day or two of waiting for better conditions often adds years to a driveway’s life. Pushy schedules are a red flag.
Decorative options and their impact on time
If you choose color, stamping, exposed aggregate, or borders, the timeline shifts. Integral color is batched at the plant and adds no time, but requires consistent loading and mixing to avoid variation. Shake-on color hardeners demand a wider finishing window and more crew members to distribute and work it in at the right moment.
Stamping uses pattern mats pressed into the surface when it is firm enough to hold detail yet soft enough to accept texture. That window can be short, https://telegra.ph/Cement-Truck-to-Curing-How-Contractors-Install-a-Concrete-Driveway-Safely-01-07 especially in warm weather. Release agents and careful timing mean the crew lingers longer on site, and they will likely return the next day to wash, cut joints if not already cut, and seal after an appropriate cure. Expect decorative work to add a day or two to the schedule and to tighten the reliance on weather.
What the homeowner does during the job
There are two short lists worth keeping, one before the pour and one after. Keep them visible and the process goes smoother.
Before the pour:
- Clear the driveway area, including cars, planters, and kids’ gear, and plan alternative parking for a week.
- Confirm joint layout, thickness, and any reinforcement in writing, including Concrete PSI and finish type.
- Discuss drainage and slopes; stand with the contractor at the garage and street to agree on water paths.
- Ask how many cement trucks are scheduled, their intervals, and the plan if a truck is delayed.
- Confirm curing and access restrictions, including who is responsible for sawcut timing.
After the pour:
- Keep people, pets, and sprinklers off the slab for the first 24 to 48 hours, and block off the apron with cones or caution tape.
- Do not drive on the concrete for at least 7 days, longer if temperatures are cool or vehicles are heavy.
- Avoid deicers during the first winter, especially products with ammonium nitrates or sulfates; use sand for traction instead.
- Hose off fertilizer or spilled solvents promptly; early-age concrete is more vulnerable to staining and surface damage.
- Schedule sealing at 28 days or later if recommended for your climate and finish.
Common pitfalls and how contractors head them off
Two mistakes show up most often: poor base and rushed finishing. The first reveals itself in frost heave, settled tire tracks, and random cracking within a few months to a year. The fix is prevention: proper excavation, compaction, and drainage. The second shows in scaling, crazing, and delamination. You avoid it by not overworking the surface, waiting out bleed water, keeping water addition in check, and curing properly.
Another pitfall is rebar or mesh lying on the ground. Step on the grid. If it barely moves and you cannot slide your boot under by two inches, ask them to re-chair it. Sawcut joints that wander or stop short of corners often lead to cracks radiating from those points. A thoughtful crew chalks lines or runs a guide.
Finally, be wary of bids that skip reinforcement, promise same-day drive-on access, or offer to make the slab thinner “where it doesn’t matter.” Strength and thickness are not places to economize.
Timeline at a glance, with realistic ranges
Every site is different, but you can expect this general cadence for a 600 to 900 square foot driveway:
- Preconstruction: 1 to 2 weeks for estimates, permits if needed, and scheduling. Longer in busy seasons.
- Demolition and haul-off: 1 day, 2 days if access is tight or the slab is thick and reinforced.
- Base preparation and forms: 1 day for typical drives, 2 days with complex grading or curves.
- Reinforcement and pre-pour checks: half day, often combined with form day.
- Pour and finish: half day to full day, weather dependent, with sawcutting later the same day or next morning.
- Initial cure: 1 to 2 days before foot traffic; cones and barriers remain.
- Vehicle access: 7 to 10 days for passenger cars, 10 to 14 for heavier loads.
- Sealing (if applicable): 28 days or later.
Stacked end to end without weather or permit delays, many residential driveways finish in about a week from mobilization to walkable concrete, with vehicles returning the following week. The visible work is short, but the planning and curing windows are what make the difference between a slab that looks good for a season and one that holds up for decades.
The crew’s perspective and the homeowner’s peace of mind
The best crews move like they have done this a hundred times while treating your project like it is the first. They set forms squarely, obsess over water paths, and keep the cement truck honest on water. They own enough Concrete Tools to match the day’s conditions rather than fighting the slab into submission. They also overcommunicate. If wind speed picks up or a cold front slides in, the schedule changes. It is not dithering, it is experience speaking.
You can help by aligning on expectations. Agree on Concrete PSI and mix features. Confirm reinforcement. Walk the joint layout. Get the curing plan in writing. If you want decorative elements, accept that the weather has a stronger vote. And insist that the crew blocks the driveway so no well-meaning neighbor or delivery driver tests the surface too soon.
A concrete driveway is a simple structure on paper: a slab over compacted rock. In practice, it is a series of time-sensitive steps with physics and chemistry under the surface. Respect the sequence, give the slab the time it needs, and you will hear the satisfying sound of tires on a crisp broom finish for many years to come.
Name: San Antonio Concrete Contractor
Address: 4814 West Ave, San Antonio, TX 78213
Phone: (210) 405-7125
This is the logo of San Antonio Concrete Contractor https://sanantonioconcretecontractor.net/assets/san-antonio-concrete-contractor-san-antonio-tx-logo.png
San Antonio Concrete Contractor is a local business located at 4814 West Ave, San Antonio, TX 78213
San Antonio Concrete Contractor serves consumers with residential and commercial concrete projects
San Antonio Concrete Contractor offers free quotes and assessment
San Antonio Concrete Contractor phone number is (210) 405-7125
San Antonio Concrete Contractor has the following website https://sanantonioconcretecontractor.net/
San Antonio Concrete Contractor has the following google map listing https://share.google/d8wsdJhNohh11Oyi5
San Antonio Concrete Contractor has this Facebook page https://www.facebook.com/profile.php?id=61581404267593
San Antonio Concrete Contractor has this twitter profile https://x.com/SanAntConcContr
San Antonio Concrete Contractor has this Pinterest profile https://www.pinterest.com/SanAntonioConcreteContractor/
San Antonio Concrete Contractor has the following Linkedin page https://www.linkedin.com/in/san-antonio-concrete-contractor-846606388/
San Antonio Concrete Contractor has this Youtube channel https://www.youtube.com/@SanAntonioConcreteContractor
San Antonio Concrete Contractor serves residents near Thomas Jefferson High School
San Antonio Concrete Contractor provides services near The Alamo.
San Antonio Concrete Contractor helps residents close to San Antonio Police Department at 3635 E Houston St, San Antonio, TX 78219