Garage Cabinet Builders Share Mistakes to Avoid
The best garage storage projects are the ones you barely notice six months later. Doors swing cleanly. Drawers glide. Everything has a place, and the system still looks like it did on day one. You do not reach that point by luck. You get there by dodging the quiet mistakes that cause sagging boxes, racked doors, swollen shelves, and wasted money.
I have spent years inside garages that ranged from 1920s brick to new-construction slabs. I have seen oak cleats hold up a thousand pounds without a squeak, and I have watched bargain cabinets peel apart the first summer. What follows is a candid tour of the errors garage cabinet builders work hard to avoid, and how homeowners can steer clear of them, too. Whether you plan to hire a garage cabinet company or handle your own garage cabinet installation, the details here will save you time and frustration.
Skipping the inventory and workflow map
Most problems start before the first screw hits the stud. People buy boxes, then try to make their lives fit inside. That is backward. The smarter approach begins with a rough inventory and a sketch of how you use the space.
I ask clients to pull everything into zones on the floor. Yard tools in one area, automotive supplies in another, seasonal bins in a third. We count bulky items, measure the tallest coolant bottle and the heaviest tool chest, and identify the things that must be easiest to grab. That 18 gallon storage bin might seem standard until you realize your holiday lights bins are 21 inches tall and 28 inches long. A shelf height off by an inch costs you an entire bay.
Then we map traffic. Do you pull the car in tight on the passenger side because of a column or water heater? Does a door swing into the workbench path? Where does a stroller or golf bag land on a rainy night? A good layout avoids choke points. If you open a cabinet door and it blocks your access to the freezer, you will hate the cabinet no matter how pretty it is.
A final part of the plan is honest growth projection. In my experience, most garages gain about 10 to 20 percent additional storage burden within two years. That can be a dirt bike, an air compressor upgrade, or kids’ sports gear that multiplies in the dark. Build room for growth or include one tall bay that can convert from shelves to hanging space without a headache.
Choosing the wrong materials for a garage climate
Garages are rough spaces. Many are not conditioned. Atlanta is a good example. Summers are humid, winters swing cool and damp, and occasional cold snaps test every joint. I see two consistent material mistakes.
First, low density particleboard with paper or thin melamine skins used as if it were furniture grade. In a bedroom, it garage cabinet design might hold. In a garage that breathes moisture and dust, screw threads loosen and panels swell. If you want painted cabinets, look for moisture resistant MDF for doors and drawer fronts, and cabinet carcasses in plywood that carries an exterior glue bond. Baltic birch and high quality maple ply are overkill for some projects, but a good 11 to 13 ply cabinet grade product resists sag and screw tear out.
Second, bare steel without a proper coating. Powder coated steel cabinets survive better than painted sheet steel, but not all powder coat is equal. Check for zinc undercoats and ask about salt spray ratings if the garage shares space with snow melt or coastal air. I have seen coastal garages where cheap steel cabinets started rust freckles within a year.
If you go with Custom garage cabinets in wood, seal all cut edges, top and bottom, especially sink cutouts or places where a hose might drip. A bead of polyurethane or catalyzed varnish costs little and pays you back over decades.
Ignoring load ratings and shelf spans
The most dangerous mistake hides in the quiet math of weight and leverage. A gallon of paint weighs around 10 pounds. A shelf with 10 gallons on the front half is carrying about 100 pounds, plus the leverage metal garage cabinets of that weight trying to peel the screws out of the back. Cheap adjustable shelf pins are not made for that. I have been called into garages where shelves bowed like a ski jump and pins chewed through holes.
Look for explicit load ratings from the garage cabinet installers manufacturer and check two numbers: the per shelf rating at a given span, and the wall attachment rating per cabinet. If a spec says 100 pounds per shelf at a 24 inch span, do not stretch that shelf to 32 inches and expect the same result. If you need wide shelves, break the span with center dividers or use thicker shelves with metal stiffeners at the front.
Wall hung systems are elegant, but the full load rides in your fasteners and the wall. A trio of 5/16 inch structural screws into studs can support a surprising amount, yet only if the studs exist where you plan to mount. In older garages, stud spacing goes off script. I have opened drywall to find a stud 19 inches on center, then the next at 13, because someone boxed around an old vent. When stud layout fights you, use a continuous steel rail or a plywood backer board tied into as many studs as possible. That spreads load and prevents the cabinet from becoming a hinge point.
Anchoring into weak or unknown walls
Not all walls are equal. I have pushed on garage drywall that felt like paper over air. The studs were clipped below three feet to make room for a former stair, which meant no safe anchor points at the right height. Brick veneer, ICF, and block walls need different fasteners than wood frame. When a wall is questionable, the mistake is forcing cabinet hardware into the wrong substrate and hoping.
Here is a short field checklist I use before committing to placement:
- Tap-test and stud-find the wall, then confirm with an exploratory hole where the cabinet will cover it. You should feel resistance when a bit hits solid wood, masonry, or metal.
- If studs are off pattern, install a 3/4 inch plywood ledger on the wall first, hitting every available stud with structural screws, then mount cabinets to the ledger.
- On concrete or block, use sleeve anchors or concrete screws rated for sustained load, and vacuum dust from the hole to prevent spin-out.
- If the wall is only furring strips on masonry, skip direct attachment and build a free-standing base or a rail that transfers load to the floor.
- When in doubt, reduce cabinet width or go to a floor-anchored unit to lower leverage forces.
Overlooking floor slope and unleveled bases
Garage floors are not level by design. Builders pitch them toward the door for drainage, often 1 to 2 percent slope. A run of 12 feet can rise or fall as much as 3 inches. If you drop a cabinet bank directly on that slab without leveling feet or a scribed toe kick, doors will never align and drawers can creep open. Homeowners sometimes think the cabinet is defective. Most of the time the floor is challenging the work.
Adjustable feet or a continuous level base is the fix. I prefer a pressure treated plinth shimmed and laser leveled, then skinned with a painted toe to keep debris out. Level first, then set cabinets. It sounds basic, but I still see installs where people shim one side of a cabinet and forget to tie the whole run to a single plane, which guarantees cumulative error down the line.
Misplacing power, lights, and service access
Garage cabinets swallow wall space that often hides electrical outlets, hose bibs, or clean-out caps. During one project, a client asked for a tall locker exactly where a GFCI outlet fed his compressor. He never used the outlet, so he figured it was fine. Two months later he bought an EV and needed that circuit moved. We pulled the locker, opened a finished back panel, and lost half a day.
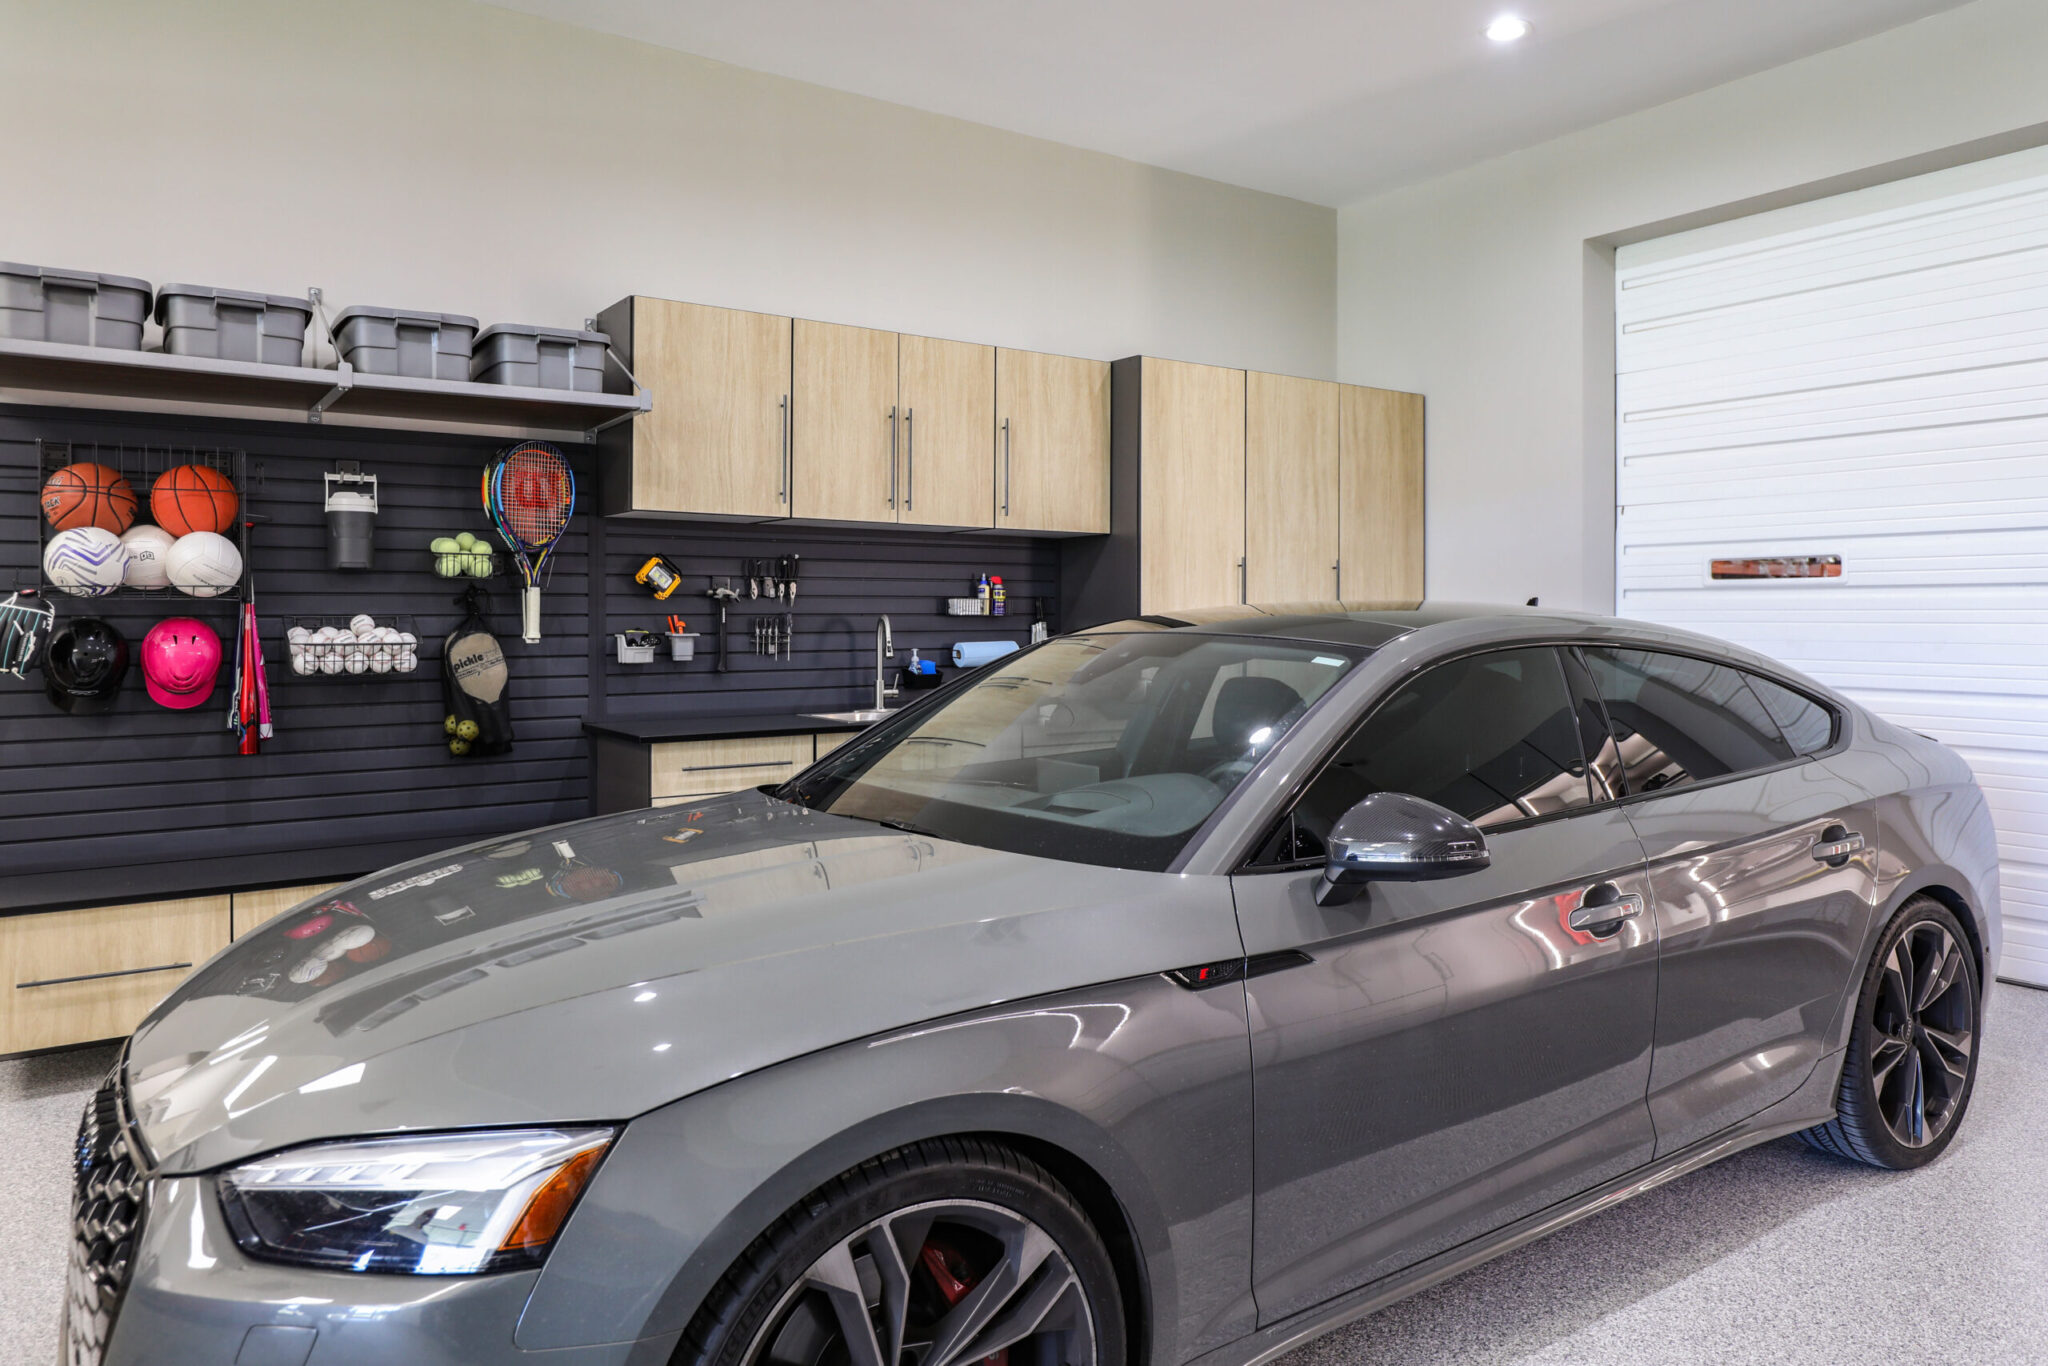
Before you commit to placement, mark every outlet, switch, and service point on your sketch. Consider what you might upgrade later, from 240 volt tools to ceiling mounted lifts. If you think you will add a welder in two years, run conduit now behind the cabinet bank. Cabinet backs with removable panels make future work simple. Task lighting under uppers changes your bench experience and costs very little if planned early. A strip of LED under a face frame, with a switch near the bench vise, feels like a luxury and keeps fingers out of the shadows.
Designing without the user’s body in mind
The right cabinet puts your most used items in the strike zone between knee and shoulder height. I see too many installs that treat all bays the same and force you to bend for heavy items or reach overhead for solvents. It is a fast way to avoid your own garage.
Think in zones. Heavy tools and dense fasteners live from 20 to 40 inches off the floor in drawers. Spray cans and quarts of oil do well at chest height with a lip to keep them from diving during an earthquake or a door slam. Long handled tools belong on vertical panels or inside a tall shallow cabinet with clips. If you brew beer or rebuild carburetors, you need a sturdy counter at your elbow height, not a bar table stolen from the basement.
Doors matter, too. In a narrow garage, full swing doors can clip a car mirror or compete with a side door. Sliders solve the swing problem but steal interior depth and collect dust in tracks. In Atlanta and similar climates, sliders also trap humidity, which I have seen condense and rust stored chisels and mower blades. Bi-folds are a compromise but require better hardware to stay square. When in doubt, narrow swing doors on well set hinges usually win.
Treating hardware as an afterthought
Hardware is not decoration. In a garage, it is armor and motion control. Hinges should be full overlay, 110 degree or better, with clip-on cups that allow easy door removal when you need to carry in a wide tool. At the budget level, look for name brand European hinges and soft-close pistons that can be replaced without swapping the whole hinge. Frequent open-close cycles in a gritty environment are hard on cheap parts.
Drawer slides deserve more respect than they get. A 75 pound rated side-mount will protest if you fill a 24 inch wide, 6 inch tall drawer with sockets and pull hard at full extension. For tool drawers, I spec 100 pound or 150 pound full extension slides, sometimes with over-travel so the back of the drawer clears the face frame. That extra inch matters when you are pulling a tray from the back. Stainless or zinc plated steel resists corrosion, but even then, a quick wipe and drop of dry lube each spring doubles service life.
Pulls and latches should match the abuse. I like large, glove friendly pulls and magnetic catches that keep doors from drifting. In coastal or high humidity areas, aluminum or stainless pulls keep their finish. Thin painted pulls chip, and once the steel shows, rust follows.
Forgetting what humidity and pests do to cabinets
A garage breathes dust and humidity, and critters explore. Open bottom voids invite mice. Unsealed backs invite wasps. Paper labels on shelves turn to curls. I have pulled a drawer only to find roach frass behind it because the back panel stopped 3 inches short of the floor.
Seal penetrations in backs and bottoms. Use silicone or acrylic where backs meet sides. Add a sweep or tight toe to floor based cabinets to block entry. For wood shelves, a coat of conversion varnish or polyurethane stops moisture and makes spills easy to wipe. For steel, keep a sacrificial mat on the bottom shelf where you store liquids prone to leak. That one mat will save you a cleanup and a finish repair.
Ventilation is a double edged sword. A perforated panel door looks nice and allows air movement, which helps dry damp gear. It also lets dust inside and moves odors into the house if your garage connects. I often use solid doors with grommeted pass throughs and choose breathable bins inside for items that need air.
Overbuilding where modularity would help, and underbuilding where permanence matters
One of the cleanest garages I maintain has a spine of permanent base cabinets with plywood carcasses and a hardwood top. Above are modular steel uppers that can be unhooked and moved. The client rotates hobbies. The permanent pieces anchor the work triangle. The rest floats.
Overbuilding everything locks you in. Underbuilding everything gives you wiggle but costs you solidity. The art is mixing. Permanent elements tie to studs, align to the floor, and carry heavy loads. Floating units live on French cleats or bolted rails, which let you swap an upper for a peg panel or a wider cabinet when you finally buy that 12 inch sliding miter saw. Custom garage cabinets shine here because a good shop builds carcasses and faces that accept multiple interior fittings later.
Treating finishes like interior cabinetry
Garage finishes must shrug off oil, sunscreen, brake fluid, and the occasional shovel handle. Satin paint on a raw MDF edge chips if a socket set grazes it. Thin melamine chips at corners. Before I sign off on a finish, I do a thumbnail test on a sample edge. If my nail dents or flakes the finish, it fails.
Catalyzed finishes, high pressure laminate faces, and powder coat on metal take abuse. If you love a painted look, ask your builder about a two part catalyzed epoxy or urethane rather than a single component enamel. Edges should be wrapped, banded with PVC, or fully sealed wood, not simply painted end grain. And skip glass doors. They look pretty in a showroom, but in a working garage they are a cracked pane waiting to happen.
Rushing garage cabinet installation
A rushed install invites small errors that snowball. One Friday I watched a builder hang an upper without checking door gap, then use that cabinet to reference the next three. By the time we hit the corner, the faces were out by almost a half inch and the crown shadow line was a roller coaster. We pulled two cabinets and reset. Two hours lost, but worth it.
Mount uppers first so you can work with open floor. Use ledger boards to hold cabinets at height. Clamp faces before driving screws between carcasses. Check level and plumb at each cabinet, not just at the ends. In long runs, shoot a laser line for the top and front face so you can catch twist early. If the door gaps drift, shim hinges, not boxes. If a face frame fights you, loosen, adjust, and retighten, do not force.
Underestimating how much a clean shop helps
Sawdust and drywall grit act like 120 grit sandpaper on slides and hinges. I have learned to stage Cabinet Day. The day before install, sweep and vacuum the garage, then blow dust out of the studs and trim if the walls are open. Lay down moving blankets or Ram Board. Protect the car whether you think you will work near it or not. The hour you spend on prep pays itself back while you are not rescuing a dropped hinge screw from under a tire.
Neglecting code, safety, and insurance details
Garages carry hazards. Flammables, ignition sources, vehicles, and sometimes a water heater. If you live in an area like Fulton or DeKalb County, inspectors care about clearances near gas appliances and egress paths. A garage cabinet company that works regularly on Garage cabinets in Atlanta will know local rules, including how far a cabinet must be from a water heater flame or how to maintain a clear path from a side door.
If you suspend heavy cabinets over the hood of a car, your insurance company might ask questions if there is a claim. It helps to have documented load ratings and photos of anchoring. Save that paperwork. If a friend helps you install and you drop a cabinet, homeowner’s insurance might not love the story. A licensed installer carries liability coverage. I still encourage clients to photograph each wall before we skin it with cabinets. Stud locations, wire runs, and plumbing lines are in those photos forever.
Failing to plan for the mess makers: liquids and fasteners
Cabinets are not only for storage, they are for containing problems. I like to dedicate one shallow drawer to absorbent pads, nitrile gloves, and a roll of paper towels. Another drawer lives as a fastener and hardware zone with dividers that match the screws and bolts you use most. A deep pullout bin under the bench gets the drain pan, kitty litter, and funnels.
Without this planning, spills travel. Oil bottles topple. A loose box of mixed screws migrates across the bench like ants. Garage cabinet builders design around the mess. It is a quiet difference that shows up on a Saturday afternoon when you fix a leaky line and your cleanup kit is exactly where your right hand expects it.
Buying on price alone
There is always a cheaper cabinet. The trap is that cheaper usually hides in hinges, slides, finish, and board cores, the very places you will stress later. You can save money smartly. Use fewer drawers, more shelves. Keep uppers shallow to conserve material. Skip full-height doors that require perfect walls and choose modular bays that forgive a hump. But do not skimp on the stuff that moves or holds weight.
A good garage cabinet company will walk you through these choices and tell you where they would save on their own garage. The best answer is rarely the most expensive. It is the build that meets your needs with enough headroom for error.
Vetting your installer, not just the brochure
Cabinets are half product, half craft. When you talk to Garage cabinet builders, ask about their approach, not just their catalog. I keep three questions in my pocket for clients to use.
First, how do you anchor uppers on an uneven stud layout? You want to hear about ledgers, rails, or backer boards, not hope. Second, what is your go-to hinge and slide brand, and can I see a cabinet with 12 months of wear? If they can show you a job they installed last year, and the doors still close square, that is a good sign. Third, how do you handle a floor that is out by more than an inch across a wall? This separates installers who carry lasers and scribe saws from folks who pray to the shim gods.
In areas with specific climates, local knowledge matters. For Garage cabinets in Atlanta, the smart crews have opinions about dehumidifiers, epoxy floor timing in summer, and which wall faces afternoon sun. They will talk about door gaskets and pest control, not just colors.
A maintenance rhythm that keeps everything like new
Once the install is tight, a simple rhythm preserves it. Twice a year, vacuum door and drawer tracks, check hinge screws, and wipe finishes with a mild cleaner. Spin drawer slide disconnect levers once to work out grit. Look at the bottom shelf of any cabinet that holds liquids. If you see yellowing or bubbling, swap the mat or reseal before the finish lifts.
If a door starts to rub or a drawer loses its soft close, do not live with it. Five minutes with a screwdriver and a dab of lubricant restores feel. Every spring, pull one cabinet bay to access and inspect the wall, especially behind a sink or near an exterior wall. It is remarkable how often that simple check catches a slow leak or ant trail before it becomes a repair.
A quick pre-install sanity check
Use this short list just before you sign off on the plan:
- Measure every large item you will store, including odd bin sizes and the tallest bottle. Adjust shelf heights now, not after doors are hung.
- Verify wall structure at every planned anchor point, and plan rails or backers if studs do not line up.
- Confirm floor slope across each cabinet run, and decide on adjustable feet or a leveled plinth.
- Map and photograph electrical, plumbing, and any gas lines on the walls to be covered, and plan access panels.
- Choose hardware grades that match actual loads, not catalog photos, and keep a small box of spare hinges and slides on site.
Where custom shines, and when stock is smarter
Custom garage cabinets earn their keep in three scenarios. First, when walls wander out of square or have obstructions like meter bases or angled returns. Custom shops notch and fit around those bumps cleanly. Second, when you need purpose built storage like a pullout for a table saw stand or a deep vertical bay for ladders behind doors that match the rest of the run. Third, when finish and proportion matter because the garage is an extension of the home, with a refrigerator, TV, and a work area that doubles as a weekend hangout.
Stock systems or semi-custom modules can be a better buy for simple straight runs. Powder coated steel boxes with adjustable legs set fast, look tidy, and can move if you change houses. They usually arrive with known load ratings and a clear assembly guide. I see great results when clients mix a steel kit for one wall with a custom bench and uppers for the work zone. It is not either or.
Final thoughts from the field
If you remember only a handful of principles, make them these. Plan around your actual stuff and the way you move. Respect the wall you anchor to and the slope under your feet. Choose materials and hardware built for a garage, not a guest room. Leave a margin for the future. And if you hire, choose Garage cabinet builders who can explain their method, not just their price.
Done right, cabinets turn a garage from a catchall into a machine that serves your life. The finished space stays quiet and reliable. Doors close with a soft click, shelves stand straight, and the mess has a place to go. That feeling is not an accident. It is the sum of a hundred small, careful decisions made before the first box goes on the wall.
Garaginization of Atlanta
Address: 1710 Cumberland Point Dr Suite 22, Marietta, GA 30067
Phone number: (770) 802-1355
FAQ About Garage Cabinet Company
How much should garage cabinets cost?
Garage cabinets cost anywhere from $500 to $10,000+ depending on whether you choose DIY-friendly plastic/resin units, ready-to-assemble steel sets, or full custom installations. Costs scale based on the material, garage size, and whether you pay for professional installation.
Who has the best garage cabinets?
Finding the "best" garage cabinets depends on your budget and storage needs. For heavy-duty use and premium quality, NewAge Products is widely considered the best overall. For excellent mid-tier value, Gladiator is highly rated, while Husky provides the best budget-friendly metal options.
Is Garage Organization.com legit?
Yes, Garage-Organization.com is a legit e-commerce retailer that sells garage storage cabinets, shelving, and organizational systems. While they are a legitimate business, there are a few important things to know before you buy.