Why Installation Matters More Than the Window: 5 Installation Truths That Change Everything
1. Why most homeowners get it wrong: the window itself is only part of the story
Have you ever wondered why a top-tier window can still leak, rattle, or fail early? Many people assume buying the most expensive glass or the fanciest frame guarantees decades of performance. That assumption ignores a crucial fact: installation is the system that makes the window work. What good is a thermally efficient sash if water is routed behind it or the frame is not square? What good is a black vinyl frame with excellent sightlines if it distorts under summer sun because it was tightly screwed into a rigid opening with no allowance for expansion?
Think about your last renovation. Did the crew check the condition of the rough opening, flashing, and sill? Did they follow the manufacturer's installation instructions down to torque on fasteners? These details determine whether a window will stay airtight, watertight, and true to shape. A correct installation addresses structural alignment, water management, thermal movement, and air sealing. Missing any of those makes the expensive materials irrelevant. Ready for a checklist that actually prevents problems, not just sells features?
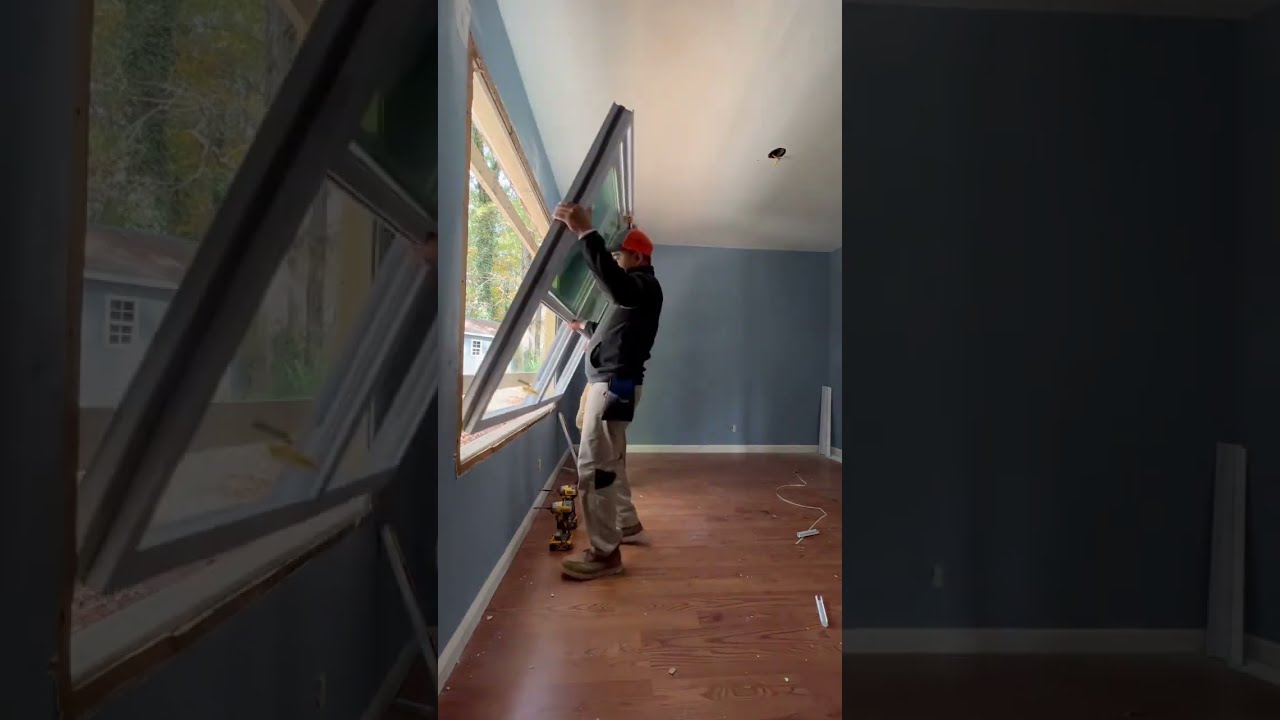
2. How rough openings and framing errors create long-term problems
Is the rough opening square, plumb, and level? Simple question, big consequences. If a window is forced into a crooked or oversized opening without proper shimming and support, you can expect uneven loads on the frame. That causes sash binding, poor seal compression, and accelerated wear on hardware. Over time, the frame can twist or rack, leading to gaps at corners where water and air find a path.
Specific example: a 3/8-inch twist in a 4-foot opening might not look like much during installation, but it can exceed the tolerance of locking hardware and weatherstripping. What should installers do? They should measure diagonals, use pressure-treated bucks when the substrate is damaged, and install continuous shim packs at the head, sill, and jambs - not just random shims. Fasteners must be driven where the manufacturer specifies, often into framing members rather than sheathing. In load-bearing walls, structural buck or reinforcement prevents deflection once the envelope is finished. Poor framing also complicates flashing integration. Ask your contractor: can I see your plan for shimming, backing, and anchor placement before work begins?
3. Why black vinyl windows warp more in direct sun - and how installation controls that
Black absorbs more solar energy. That fact alone makes black vinyl frames hotter in full sun, especially on south- or west-facing exposures. When a frame heats unevenly, thermal expansion and softening occur. Vinyl will expand and contract more than aluminum or wood, and a dark finish increases the temperature delta. If installers fasten a black vinyl frame rigidly to a nailer or block with no allowance for movement, the heated frame can bow or warp, leading to operation problems and visible distortion.
What can you do? First, pick a window design with proven thermal movement allowances. Second, insist on installation techniques that permit sliding or floating of the frame within the rough opening at specified anchor points. For example, many manufacturers call for compression-seal gaskets plus screws set with specific clearances in pre-drilled slots rather than tight set screws. Use of slip-joint anchors or oversized screw holes (with neoprene washers and controlled torque) lets the frame move slightly without stress. Also consider shading strategies: exterior overhangs, awnings, or film can lower surface temperatures on south walls. Have you asked whether the chosen frame color is appropriate for that exposure?
4. Flashing and water management: the low-skill mistakes that ruin walls
Could a missing strip of tape or a backwards sill pan really lead to rot inside your wall? Yes. Water will find the smallest path. An improperly flashed window can allow rain or condensation to enter the wall assembly and feed hidden decay. Proper water management involves multiple layers: sheathing membrane, continuous head flashing, sill pans with a slope, end dams or kickouts where required, and integration with housewrap. Each interface must shed water to the exterior; anything that bridges those planes creates a risk.
Example of a common failure: installers place a sill pan but fail to create a slope trailtimes on the pan or forget the drain holes at the lowest point. Water then pools against the sill and works its way into the bottom plate. Or the head flashing isn't lapped over the housewrap correctly, letting wind-driven rain be forced behind the trim. Correct installation follows a drainage plane philosophy: every component must direct water down and out. Ask to see the flashing detail for your window, and request installation photos at each critical stage - rough opening, flashing, window set, and trim sealing. Does the crew have a written inspection checklist for these items?
5. Air sealing and insulation at the reveal: comfort and longevity depend on it
Why does that new window feel drafty in winter even though it has triple glazing? Often the problem isn't the glazing but the gap between the frame and the rough opening. If the installer uses minimal backer rod and caulk instead of a controlled insulating seal, air and moisture can move through the cavity, undermining the window's thermal performance and creating condensation risk. How you insulate the reveal affects both comfort and the long-term health of the assembly.

Practical approaches include closed-cell spray foam applied in measured amounts to avoid bowing the frame, or low-expansion urethane foam designed for window installations. In some historic or plaster walls, a combination of compressible foam tape and non-expanding backer rod with a silicone exterior bead gives a durable seal. Pay attention to thermal bridging: continuous insulation on the exterior of the sheathing can drastically reduce frame-to-wall heat transfer. Also, avoid using canned foam indiscriminately; over-expansion can warp frames and void warranties. Ask contractors what products they use, why those products are chosen for your wall type, and whether the application will be inspected before trim is installed. Would you accept a sealed envelope that wasn't photographed and documented?
6. What to demand from your installer: qualifications, testing, and documentation
How do you tell a careful installer from one who cuts corners? Certifications and a paper trail matter. Look for contractors who follow AAMA or ASTM installation standards and who are familiar with the window manufacturer's instructions. Manufacturers often require specific fastener types, anchor spacing, and sealing methods to maintain warranty coverage. An installer who ignores those details could invalidate your warranty and leave you responsible for future problems.
Ask for references and recent job photos showing rough opening prep, flashing installation, fastener locations, and final seal details. Does the contractor perform on-site water tests or blower door tests to confirm air tightness? Some installers will do a temporary water test before finishing trim to prove the flashing works. Demand a written scope that lists materials, flashing methods, fastener schedules, sealant types, and expected tolerances for plumb and square. Also verify insurance, bonding, and whether the installation crew is factory-trained for the product. Would you sign off without a completion report that documents those items?
7. Your 30-Day Action Plan: inspect, fix, and protect your windows to avoid warping and water damage
Ready for a practical plan you can act on in the next month? Follow this checklist to reduce risk, document conditions, and force accountability. Week 1 - Inspect and record: walk around your home on a sunny day and photograph each window from multiple angles, focusing on frames exposed to direct sun, especially dark-colored vinyl. Inside, check for gaps at the sash perimeter, soft spots in the sill, or signs of condensation or staining on the reveal. What do the photos show about squareness and operation?
Week 2 - Ask and verify
Contact the installer or contractor and request the installation instructions for your window model. Ask whether anchors were installed per those instructions and request photos of rough opening prep and flashing. If you have black vinyl windows on south or west walls, ask whether anchors allow for thermal movement and whether the fastener holes are oversized as recommended. If the installer cannot provide documentation, schedule a third-party inspection.
Week 3 - Mitigate simple risks
Small fixes are often effective. Add exterior shading where practical - a modest overhang or solar film can lower frame temperatures significantly. Replace failing exterior caulk around trim with a high-quality silicone or polyurethane sealant, following manufacturer guidance. If you spot soft sheathing or standing water at a sill, install temporary flashing or a drip edge and call for a repair estimate.
Week 4 - Document and plan for bigger fixes
Compile your photos, inspection notes, and any contractor responses into a single folder. If thermal bowing or water intrusion is evident, get written repair proposals that describe corrective flashing, replacement of damaged framing, and reinstallation of the window with manufacturer-approved anchors. Ask for warranties on both work and materials. Schedule repairs during a season with less thermal stress if possible - cooler months reduce the risk of further movement during rework.
Comprehensive summary: what to expect and what to refuse
Do not accept vague promises about "we'll make it work." Demand specifics: anchoring methods that permit thermal movement, detailed flashing that follows the drainage plane principle, measurable insulation and air sealing, and a photo-documented installation log. Pay attention to black vinyl windows on sun-exposed walls - they need special handling. Insist that the installer follow the manufacturer's instructions exactly and produce proof they did so. If they cannot or will not, find someone who will.
Would you rather pay a little more now for a properly detailed installation or face expensive repairs later? The decision is clear: focus less on the label on the window and more on the system around it. A well-installed mid-range product will outperform a premium unit that was badly mounted. Take the 30-day plan, ask the right questions, and make your contractor earn your trust with documentation and workmanship you can verify.